Epoxy resin has quickly become one of the most popular materials in the craft world. From jewellery and decorative trays to coasters, artwork, and moulded gifts, resin allows creators to produce pieces with depth, colour, and a glossy finish that resembles glass.
If you are new to epoxy resin crafting, it can feel slightly overwhelming at first. There are different types of resin, various pigments, mixing techniques, and a surprising number of tools that can affect the final result. The good news is that once you understand the basics, resin becomes a very rewarding material to work with.
This guide explains everything you need to know about using epoxy resin for crafts. We will look at the best types of resin, the tools that make the process easier, how pigments work, and some simple techniques that help you achieve cleaner, clearer results.
What is epoxy resin and why is it used for crafts
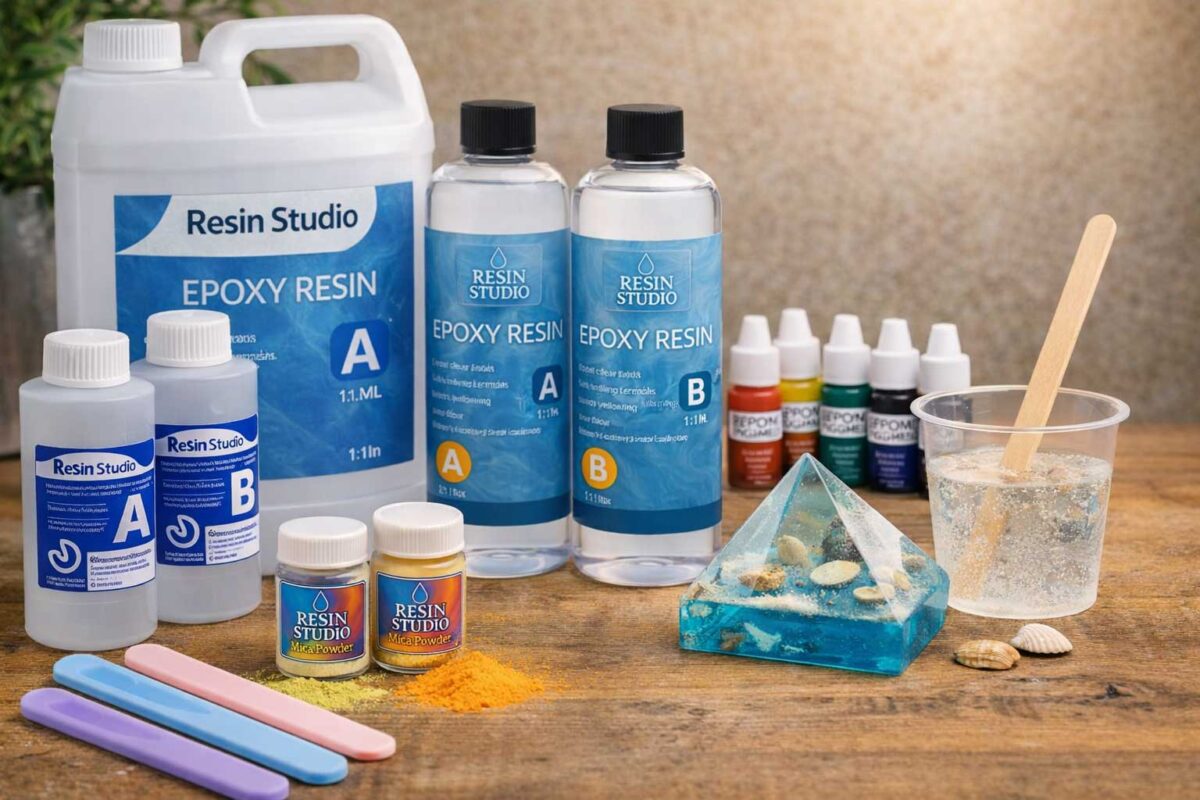
Epoxy resin is a two-part liquid system that cures into a solid plastic-like material when mixed together. The two components are normally called Part A and Part B. When combined in the correct ratio, they start a chemical reaction that gradually hardens the liquid mixture into a durable, glossy finish.
The reason epoxy resin is so popular with crafters is its versatility. It can be poured into moulds, applied as a coating, layered to create depth, tinted with pigments, or used to embed decorative items such as flowers, glitter, shells, or stones.
Some of the most common epoxy resin craft projects include:
- Resin coasters
- Jewellery and pendants
- Decorative trays
- Bookmarks
- Keyrings
- Resin artwork
- Embedded flower pieces
- Decorative castings
The glossy finish and transparency of epoxy resin allow colours and decorative inclusions to appear suspended within the material, which creates a distinctive and eye-catching result.
Choosing the best epoxy resin for craft projects
One of the most important steps in successful resin crafting is choosing the right resin for your project. Not all epoxy resins behave the same way. Some are designed for thin coatings, others for deep pours, and others are general-purpose craft resins.
A reliable all round option for many craft projects is Resin Studio Epoxy Craft Resin (4L). This larger kit includes two 2-litre bottles and is ideal for makers who regularly work with resin or who want enough material to create multiple projects, such as trays, coasters, or layered art.
If you are just beginning with resin crafting and want a smaller amount to practise with, Resin Studio Epoxy Craft Resin (2L) is a great starting point. It allows you to learn the mixing process and experiment with pigments without committing to a large volume of resin.
For smaller cast pieces and decorative items where clarity is especially important, Alumilite Amazing Clear Cast Epoxy Resin (16oz) is often used by jewellery makers and craft artists. This resin cures to a clear finish that highlights embedded items such as dried flowers or glitter.
How two part epoxy resin works
All craft epoxy resins work using a two-part system. One component is the resin, and the other is the hardener. When mixed together in the correct proportions, they begin a curing reaction.
The process usually follows these steps:
- Measure the correct ratio of resin and hardener
- Mix slowly and thoroughly
- Add pigments or decorative materials if desired
- Pour the mixture into a mould or onto a surface
- Allow the resin to cure undisturbed
Accuracy is important when working with resin. If the resin-to-hardener ratio is incorrect, the mixture may not cure properly. This can lead to sticky surfaces or soft areas in the finished piece.
Essential tools for epoxy resin crafting
While epoxy resin itself is the main material, the tools used during the process also play a big role in the final result. Proper mixing tools help combine the resin components evenly and reduce bubbles.
Silicone Stirring Sticks are a popular choice for resin mixing. Silicone tools have several advantages over disposable wooden sticks. Resin does not permanently stick to silicone, and cured resin can be peeled away easily, allowing the tools to be reused many times.
Reusable silicone tools also help reduce waste and make the mixing process more controlled. The flexible edge allows you to scrape the sides and bottom of the mixing cup, ensuring the resin and hardener fully combine.
Another useful accessory is High-Temp Polyester Tape. This type of tape is often used to mask areas before pouring resin or to create clean edges in artwork. Because epoxy resin produces heat while curing, high-temperature tape remains stable and holds its shape better than standard tape.
Adding colour with epoxy resin pigments
Colour is where epoxy resin projects really start to stand out. Pigments allow you to customise the appearance of resin and create unique designs ranging from subtle translucent tones to bold opaque colours.
A good option for beginners is the Epoxy Resin Pigment Set. Pigment sets offer a range of colours that can be mixed to create custom shades and effects.
When adding pigments to resin, it is important to start with a small amount and gradually increase the colour intensity if needed. Resin pigments are highly concentrated, and even a small drop can dramatically change the colour of the mixture.
Some popular pigment techniques include:
- Marbled colour effects
- Layered pours
- Ocean wave artwork
- Geode style designs
- Abstract resin art
The movement of the liquid resin itself often contributes to the final design, which means each piece becomes slightly unique.
Creating shimmer and metallic effects with pearl pigments
Pearl pigments introduce a completely different visual effect compared with standard colour pigments. Instead of producing a solid colour, pearl pigments reflect light, creating a shimmering appearance.
The Pearl Pigment Colour Set is often used in jewellery, decorative trays, and resin artwork where a reflective finish enhances the design.
These pigments can be used on their own or combined with regular colour pigments to create layered effects. When mixed into clear resin, they create swirling patterns that resemble natural stone or shell.
Pearl pigments are especially effective in projects that catch the light, such as pendants, coasters near windows, or glossy decorative pieces.
Popular epoxy resin craft project ideas
If you are looking for inspiration, there are many creative projects that can be made using epoxy resin. Beginners often start with simple mould-based items before moving on to larger decorative pieces.
- Resin jewellery including pendants and earrings
- Decorative coasters
- Serving trays with coloured resin designs
- Bookmarks with dried flowers
- Embedded shell or glitter pieces
- Resin letter moulds
- Abstract resin artwork
These projects help you practise measuring, mixing, colouring, and pouring techniques while building confidence with the material.
Tips for getting clearer resin results
Clear resin results require careful preparation and patience. A few simple habits can dramatically improve the final appearance of your projects.
- Measure resin and hardener accurately
- Mix slowly to minimise air bubbles
- Scrape the sides and bottom of the mixing container
- Work in a warm environment where resin flows easily
- Keep dust away while resin cures
- Use clean tools and mixing cups
Bubbles are one of the most common issues in resin projects. Mixing slowly and allowing the resin to rest briefly before pouring can help reduce trapped air.
Common mistakes beginners make with resin
Most people encounter a few problems when first learning how to use epoxy resin. Fortunately, these mistakes are easy to avoid once you know what to watch for.
One common mistake is rushing the mixing process. Resin must be mixed thoroughly for the chemical reaction to occur evenly. Another frequent issue is adding too much pigment, which can interfere with curing.
Working in a cold environment can also cause problems. Resin becomes thicker at lower temperatures, which makes mixing harder and increases the chance of bubbles.
Using proper tools such as Silicone Stirring Sticks and practical accessories like High-Temp Polyester Tape helps reduce many of these beginner issues.
Building a basic resin crafting setup
If you are assembling your first resin toolkit, you only need a few core items to begin creating projects. A simple starter setup might include:
- Resin Studio Epoxy Craft Resin (2L) or Resin Studio Epoxy Craft Resin (4L)
- Alumilite Amazing Clear Cast Epoxy Resin (16oz)
- Silicone Stirring Sticks
- Epoxy Resin Pigment Set
- Pearl Pigment Colour Set
- High-Temp Polyester Tape
This combination gives you a versatile foundation for a wide range of resin craft projects.
Final thoughts on working with epoxy resin
Epoxy resin crafting combines creativity with a little bit of science. The mixing ratios, curing process, and environmental conditions all influence the final result, but once you understand these factors, resin becomes an extremely rewarding material to work with.
Starting with reliable materials makes the process much easier. Products such as Resin Studio Epoxy Craft Resin, quality pigments, and proper mixing tools allow you to focus on creativity rather than troubleshooting problems.
With practice, you will develop your own techniques and discover new ways to combine colours, textures, and embedded objects. Resin crafting offers almost endless creative possibilities, and every project helps you refine your skills.
Whether you are making jewellery, decorative home items, or experimenting with resin artwork, the right materials and a bit of patience can produce results that look polished, unique, and professional.