If you have ever poured resin into a mould, waited hours, and then checked it every twenty minutes anyway, UV resin can feel like a small miracle. This beginner guide to UV resin is for makers who want quicker results, less mixing, and a simpler way to start creating jewellery, charms, keyrings, domes and glossy decorative details.
UV resin is often the easiest way into resin crafting because it comes ready to use straight from the bottle. There is no measuring, no mixing ratio to remember, and no second guessing whether you scraped the sides of the cup well enough. For many small projects, that removes the bit that feels most intimidating and lets you focus on colour, finish and design.
That said, UV resin is not the right choice for every job. It cures fast under a UV lamp or strong UV torch, which is brilliant for thin layers and small pieces, but it is less forgiving for deep pours or larger moulds where light cannot reach the whole surface evenly. Knowing that difference early saves frustration and helps you buy the right supplies first time.
What UV resin is and why beginners like it
UV resin is a one-part resin that hardens when exposed to ultraviolet light. Unlike epoxy resin, which cures through a chemical reaction after mixing resin and hardener, UV resin stays liquid until you cure it with the proper light source.
For beginners, the biggest advantage is convenience. You can open the bottle, apply exactly what you need, and cure it within minutes. That makes it ideal for people making pendants, earrings, shaker charms, cabochons, phone grips, badge toppers, bookmark details or top coats on small resin pieces.
The finish is usually very glossy, and because you are not mixing two parts together, there is less waste for tiny projects. If you only need a few drops to fill a bezel or seal dried flowers into a charm, UV resin makes much more sense than mixing a full batch of epoxy.
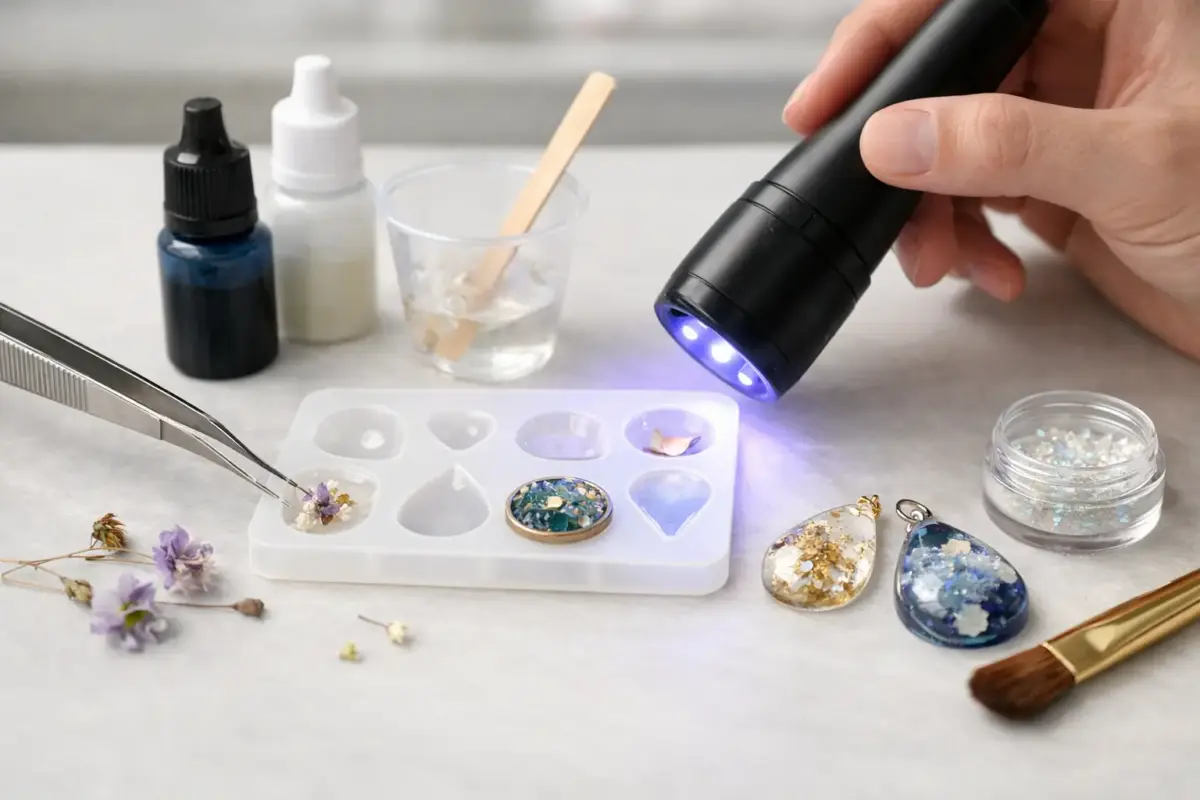
Beginner guide to UV resin supplies
Starting well matters more than starting with loads of products. You only need a small set of reliable basics to get going confidently.
First, you need the UV resin itself. After that, the most useful items are a UV lamp, silicone moulds or bezels, mixing or placement tools for add-ins, gloves, and a clean working surface. If you want decorative effects, pigments, glitters, mica powders, foils and dried flowers all work well, but it is worth learning the resin before buying every embellishment at once.
A proper UV lamp is usually a better choice than relying on daylight. Sunlight can cure UV resin, but it is inconsistent in the UK and can leave you guessing whether a piece is actually finished. A lamp gives you much more control and helps you repeat results from one project to the next.
It is also worth using safety gear from the start. Even if UV resin feels simpler than epoxy, it still needs sensible handling. Gloves, ventilation and a tidy bench set-up make the whole process easier and safer.
How to use UV resin step by step
The good news is that the process is straightforward. The part that makes the biggest difference is patience with layers.
Start by preparing your mould, bezel or surface. Make sure it is clean, dry and free from dust. If you are adding inclusions such as glitter, dried flowers or small shapes, lay them out first so you are not scrambling once the resin is on the piece.
Apply a thin layer of UV resin rather than trying to fill everything in one go. This is where beginners usually get into trouble. Because UV light needs to reach through the resin to cure it properly, thinner layers cure more reliably and stay clearer.
Once the layer is in place, cure it under your UV lamp for the recommended time for your set-up. Exact times vary depending on the lamp strength, the brand of resin, the colour additives used and the layer thickness, so there is no single answer that suits every bottle. If the surface still feels tacky or soft, give it longer.
If you are building depth, repeat the process in layers. Add resin, cure, then add the next layer. This is especially important when working with opaque pigments, dark glitters or embedded objects, because these can block light and slow down curing.
When your piece is fully cured, check the back and edges. A top surface can look finished while the underside still needs more time. Turning the piece and curing again often helps with complete hardening.
What UV resin is best for
UV resin works best on small, shallow projects where light can reach the material properly. That includes jewellery, charms, decorative coatings, sealing surfaces, doming stickers or photos, and filling open-back bezels.
It is also useful for makers who sell small craft items and want a quicker workflow. If you are batch-making earrings or adding glossy top coats to finished pieces, fast cure times can speed up your process without adding much complexity.
Where it becomes less practical is larger moulds, thick castings or anything with significant depth. If a project needs a deep pour, a two-part resin is usually the better fit. This is one of the main trade-offs to understand early. UV resin is fast and convenient, but it is not the all-purpose answer for every resin job.
Common beginner mistakes with UV resin
The most common mistake is pouring too thickly. If the resin underneath cannot get enough UV light, it may stay sticky, flexible or partly cured even though the top looks glossy. Working in thin layers fixes a lot of problems before they start.
Another issue is adding too much pigment. A tiny amount of mica, liquid colour or glitter can look beautiful. Too much, especially in darker shades, can block the light and stop the resin from curing all the way through. If you want a strong colour, build it gradually rather than loading one heavy layer.
Dust is another nuisance. UV resin shows everything because of its clear, glossy finish. Keep lids on supplies, wipe your work area, and cover curing pieces if needed while you prepare the next step.
Beginners also sometimes assume tackiness means failure. Sometimes it does mean the piece needs more curing time, but sometimes it can be caused by the lamp, pigment load, or a layer that is simply too thick. Adjusting one of those factors usually solves it.
Safety and working neatly
A beginner guide to UV resin should always include safety, because confidence comes from good habits. Work in a ventilated area, avoid skin contact, and wear gloves when handling uncured resin. If resin gets on your tools or mat, clean it before curing so you do not end up with hardened residue where you do not want it.
It also helps to protect your eyes from direct UV exposure by using your lamp properly and not staring into the light. Keep bottles closed when not in use and store them away from sunlight or bright windows, otherwise you may cure the product in the bottle rather than in your mould.
Neat working is part of good results as well. Use small amounts, cure between stages, and have your embellishments ready before you start. Resin crafting gets much more enjoyable when your bench set-up supports the project instead of slowing it down.
Choosing between UV resin and epoxy resin
If you are deciding what to buy first, the honest answer is that it depends on what you want to make. UV resin is usually the better starting point for quick jewellery and small decorative projects. Epoxy resin is often better for coasters, trays, deeper moulds and pieces that need a thicker pour.
Many makers end up using both. UV resin handles the small fast jobs and glossy finishing work, while epoxy covers projects that need depth or larger volume. If your aim is to create something beautiful quickly and learn the basics without worrying about mix ratios, UV resin is a very beginner-friendly place to start.
A good starter set-up should make the first project feel manageable, not technical. That is why a focused range of compatible resin, moulds, pigments, tools and safety essentials matters more than a huge catalogue. When supplies are chosen to work well together, beginners make fewer mistakes and get satisfying results sooner.
Your first UV resin piece does not need to be ambitious. A simple pendant, charm or domed embellishment is enough to learn how the resin moves, how your lamp cures, and how much colour is actually needed. Once that clicks, the creative part gets much easier – and much more fun.