A lot of resin problems start before the pour. Sticky patches, soft edges, bubbles that will not clear, and cloudy finishes usually come down to setup, measuring, or rushing a stage that needed a bit more care. If you are learning how to use epoxy resin, the good news is that the process is far less intimidating once you understand what each step is doing.
Epoxy resin is popular because it gives you a glossy, glass-like finish and works across a huge range of creative projects. Jewellery, coasters, trays, keyrings, artwork, doming, mould work, and layered decorative pieces all become possible with the right resin and a sensible process. The trick is not doing everything at once. It is choosing the right product, preparing properly, and giving the resin the conditions it needs to cure well.
How to use epoxy resin: start with the right setup
Before you mix anything, sort your workspace. Resin behaves best in a clean, dry, dust-free area with a stable room temperature. If the room is too cold, the resin thickens, traps bubbles more easily, and may cure more slowly or unevenly. If it is too humid, some finishes can look dull or develop surface issues.
Cover your work surface and keep your tools within reach. You will usually need mixing cups, stirrers, gloves, and a level surface for curing. If you are using moulds, have them clean and ready before you measure the resin. If you are making open pours or coating a surface, check that your piece is level first. Resin will self-level, which is helpful until it starts sliding to one side.
Safety matters as well. Wear gloves as standard, and use suitable protective equipment for the product you are working with. Good ventilation is sensible for any resin session. Beginner makers sometimes focus so much on colour and mould choice that they forget the practical side, but a better setup nearly always leads to a better finish.
Choose the epoxy resin for the job
Not all resin is meant for the same project. This is where many beginners get caught out. A coating resin for artwork and surfaces is different from a casting resin designed for deeper pours. If you use the wrong one, you can end up with overheating, excess bubbles, cracking, or a cure that takes longer than expected.
For shallow pours, top coats, and glossy decorative surfaces, epoxy resin is often the go-to choice. For deeper moulds or thicker castings, a clear casting resin may be more suitable because it is formulated to cure more safely in volume. If you want a very fast cure for small pieces and fine details, UV resin may suit a different style of making altogether.
This is where a beginner-friendly product range helps. You want resin, pigments, moulds, and bench tools that are designed to work together, not a random mix that leaves you second-guessing every step.
Check the mixing ratio every time
Epoxy resin is usually a two-part system – resin and hardener. The correct ratio is essential. Some products mix 1:1 by volume, others use a different ratio. Never assume. Always use the instructions for the exact resin you have.
Guessing is one of the fastest ways to waste materials. Too much of one part can leave resin tacky or soft, and adding extra hardener does not make it cure faster. It just throws the chemistry off. Measure carefully, and if your product gives guidance by weight or by volume, stick to that method rather than switching between the two.
Mixing epoxy resin properly
Once measured, combine the two parts and mix slowly but thoroughly. Slow mixing helps reduce bubbles, but thorough mixing is what prevents uncured patches. Scrape the sides and bottom of the cup as you stir. Most resins need several minutes of mixing, not a quick swirl and hope for the best.
A useful habit is to transfer the mixed resin into a second clean cup and stir again briefly. This extra step can help avoid unmixed material clinging to the first cup. It is especially helpful for beginners and for projects where you want a clean, reliable cure.
If you are adding colour, wait until the resin and hardener are fully mixed first. Then add pigment, mica powder, glitter, or dye in small amounts. A little usually goes a long way. Too much additive can affect the cure or reduce clarity, so build colour gradually.
Watch your working time
Epoxy resin has a pot life, which is the amount of time you have to work with it before it starts thickening. That working time changes depending on the product, room temperature, and how much resin is sitting in the cup. A larger volume in one cup will heat up faster than a thin spread on a tray or mould.
If you are new to resin, start with smaller batches. It gives you more control, less waste, and fewer surprises. Large pours can be tempting, but they leave less room for correction.
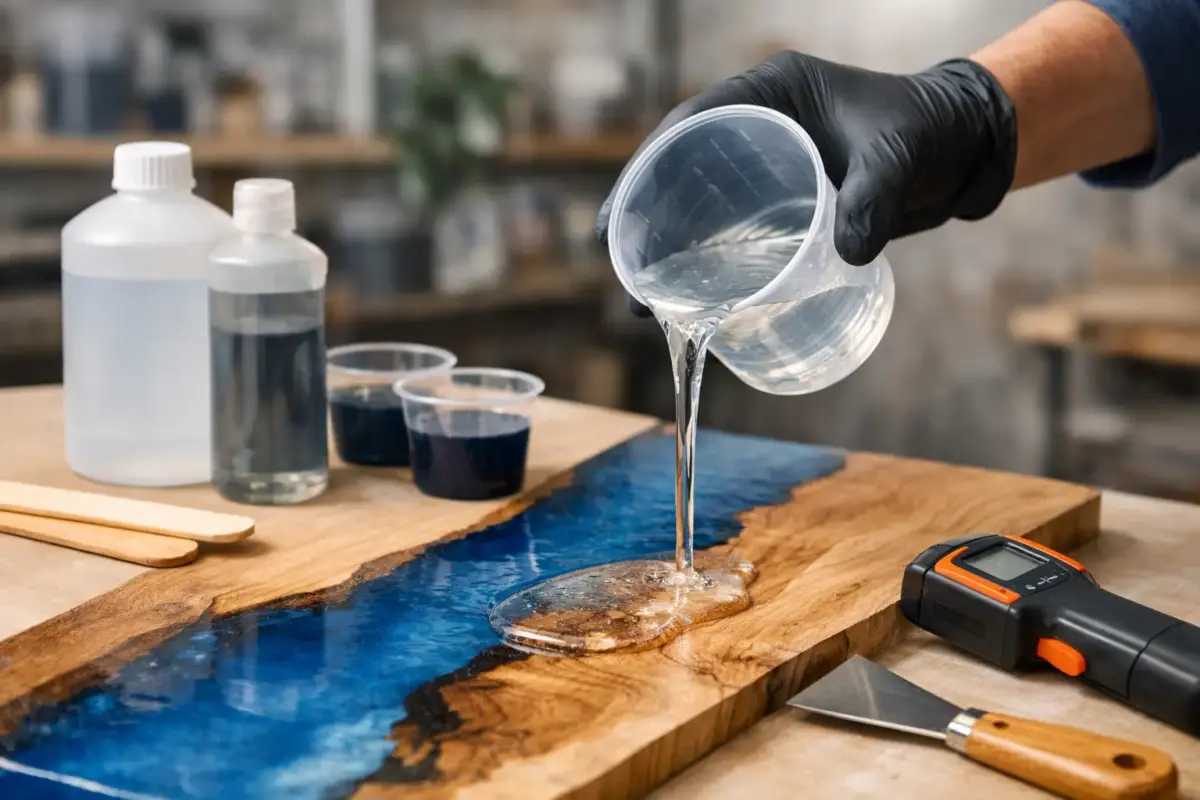
Pouring and removing bubbles
Pour the resin steadily into your mould or onto your surface. For moulds with fine details, pour slowly to help the resin settle into corners. For artwork or coatings, guide the resin gently rather than pushing it around too aggressively.
Bubbles are normal. Some rise and pop on their own, while others need a little help. Depending on your setup and resin type, you may use a heat tool carefully over the surface to release trapped air. The key word is carefully. Too much heat can scorch the resin, distort moulds, or push dust into the finish.
If clarity matters, warming the unopened resin bottles slightly before mixing can sometimes help reduce bubbles, but only do this within the product guidance. Resin is one of those materials where small changes help, while improvised shortcuts often create extra problems.
Layering and embedding
If you want to add dried flowers, glitter mixes, foils, or decorative inclusions, think about timing. Some items float, some sink, and some release air. It often works better to pour in layers rather than trying to suspend everything perfectly in one go.
Layering also helps with dimension. A thin first layer can secure your base design, and a second layer can build depth or seal embellishments. The trade-off is time. More layers usually mean a cleaner result, but they also mean waiting for each stage to reach the right cure point.
Let it cure without interference
After pouring, leave the piece alone. This sounds obvious, but it is where impatience does real damage. Moving moulds too early, touching the surface, or curing in a dusty space can spoil a piece that was otherwise going well.
Cover the project if needed to protect it from dust, and keep it on a level surface while it cures. Curing times vary by product and by room conditions, so treat the label as your guide. Some pieces can be demoulded relatively quickly but still need longer to reach full hardness.
That matters if you are making pieces to sell. A coaster that feels set on the surface may still mark if packed too soon. Full cure is worth waiting for, especially if you want a polished professional finish.
Common mistakes and what they usually mean
If your resin stays sticky, the most likely causes are inaccurate measuring, incomplete mixing, or low room temperature. If the piece cures with lots of bubbles, the resin may have been mixed too quickly, poured too cold, or used in a mould with trapped air points.
If the surface looks cloudy, moisture, excess pigment, or a poor-quality mould can all play a part. If the resin overheats, cures too fast, or cracks, the pour may have been too deep for that formula. This is why product choice is not a small detail – it shapes the whole result.
Beginners often think they need a miracle fix, but most resin issues come back to the same basics: correct ratio, proper mixing, suitable temperature, and using the right resin for the project.
Finishing your piece
Once fully cured, your piece may be ready straight from the mould, or it may need a little finishing. Edges can sometimes be sanded for a smoother feel, and some makers add a final coat or dome layer for extra gloss. If you are making jewellery or functional homeware, neat finishing details make a real difference.
This is also the stage where good accessories earn their place. Mixing tools, moulds, safety gear, pigments, and finishing supplies all work better when they are chosen as part of one resin workflow rather than picked up as an afterthought. That is one reason makers often prefer buying from a specialist like Resin Studio – it cuts down the trial and error and makes repeat projects easier to plan.
Build confidence with simple projects first
If you are still unsure how to use epoxy resin, start with something small and forgiving. Coasters, bookmarks, keyrings, and shallow moulds teach you the basics quickly. You will get a feel for measuring, mixing, bubble control, and curing without using a huge amount of material.
From there, you can branch out into layered designs, bolder pigments, decorative inclusions, or more polished pieces for gifting and selling. Resin rewards patience more than bravado. A careful small pour usually teaches you more than an over-ambitious first project.
The best way to get better at resin is to keep the process simple enough that you actually enjoy it. When your materials are compatible, your workspace is ready, and your first few makes are manageable, confidence follows – and so do the ideas for what to create next.